

v12.2
This handbook forms part of the Exmouth Gig Club Constitution and is referred to in that document as “Appendix 1”
ROLES & RESPONSIBILITIES
The committee shall be responsible for the running of the club as detailed in the club constitution, section 5. Specific responsibilities of committee members are detailed below:
- Chairman
- Lead direction of the club and ensure the correct function of the committee.
- Ensure adherence with the policies and guidelines we have adopted or compiled as a club, in line with the guidelines of the governing body (CPGA).
- Liaise with and maintain relationships with fellow gig clubs.
- Vicechair
- Support the chairman and ensure the continuation of this work in their absence.
- Treasurer
- Financial controller of the club, produce annual and ad hoc finance reports, Accounts, manage Bank Accounts, payment of invoices, collection of subscriptions, highlight any commercial issues, prepare forecast budgets and projections.
- Secretary
- Ensure effective communication is maintained within the club and especially between the committee and membership.
- Be a point of contact for 3rd parties and also responsible for notification of AGM and EGM’s.
- Health and Safety Officer
- Responsible for ensuring the safe and effective running of the club and keeping safety equipment up to the required standard.
These are classed as “senior roles” within the committee and no one person can hold two of these roles. They can, however, be combined with one or more of the below:
Other Roles
- New Membership Secretary.
- Collates membership information
- Organises introduction rows with support from the club coxes.
- *Bosun(s).
- Responsible for basic maintenance and upkeep of equipment.
- *Race Captain.
- Responsible for developing the competitive aspect of Exmouth Pilot Gig Club and driving performance at regattas.
- Duties and areas of interest may include, but not be limited to:
- Development of crew selection criteria and communicate it to all club members to ensure they understand what is required when training for and attending a regatta.
- Liaise with designated club coxes to make crew selections and ensure the coxes are informed of training requirements of crews or individual rowers
- Announce crew selections.
- Communicate rowers and liaise with the committee around decisions if any questions or challenges come forward.
- Facilitate crew training opportunities by being a point of contact for crew coordinators.
- Regularly update the committee on achievements, challenges, and any requirements
- Be the main contact both within our club and for other clubs with regards to regatta attendance, take the lead in organising towing of boat, and ensure all rowers and coxes are aware of timings etc
- Provide new club members an overview of how the club operates with regards to regatta attendance, training, and preparation.
- Work with the club’s membership secretary to “fast track” appropriate intro rowers.
- Have the ability to organise specialist intro sessions.
- *Web Site Manager.
- Operation and maintenance of the website including the booking system.
- Creation of new pages and uploading documents and media.
- Management of access (including level) of members to the website.
- *Social & Fundraising.
- Organisation of events off the water from drinks evenings to club fitness sessions.
- Exploring potential funding for the club and completing bid applications.
These roles do not have to be filled by committee personnel however the committee shall have oversight of the positions and decisions taken relating to the position. A list of the current committee members and their specific roles (if applicable) shall be attached to the club constitution at Appendix 3 and additionally can be found here.
Committee members are expected to make reasonable efforts to attend meetings and to fulfil their roles. Persons who sit on the committee and hold the position of full or club coxswain, as listed on the club website, are referred to as committee coxswains.
CORNISH PILOT GIGS
Background
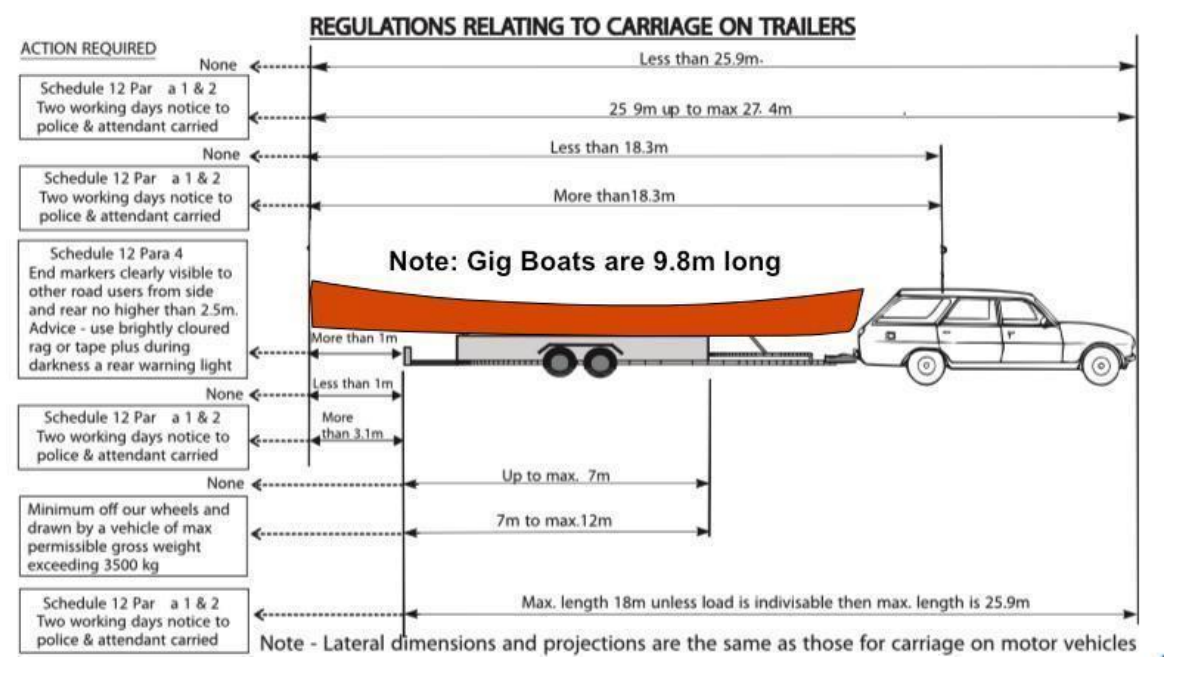
The Cornish pilot gig is a six-oared rowing boat, built of Cornish narrow leaf elm, 32 feet (9.8m) long with a beam of 4 feet 10 inches (1.47 m).

It is recognised as one of the first shore-based lifeboats that went to vessels in distress, with recorded rescues going back as far as the late 17th century. The original purpose of the Cornish pilot gig was as a general work boat, and the craft is used for taking pilots out to incoming vessels (see pilot boat) off the Atlantic. At the time, the gigs would race to get their pilot on board a vessel first (often those about to run aground on rocks) in order to get the job and hence the payment.
All modern racing gigs are based on the “Treffry”, built in 1838 by William Peters of St. Mawes, and still owned and raced by Newquay Rowing Club.
The Gig
Each gig has 8 “seats”. One for the coxswain, 6 for the rowers and a “pilot seat”. This gig has specific parts which each have their own function.

The Stretcher
The stretcher is a wooden bar which is a foot rest and used to brace and push against whilst rowing. Sitting in your rowing position, your feet should be firmly against the stretcher with your legs slightly bent. If your stretcher is not in the right position for you, remove the metal retaining pin at the end of the stretcher by twisting, unlocking and pulling it towards the bow. Lift the stretcher up at the pin side and slide out of its fixing. Reposition the stretcher and replace the pin, ensuring that it is properly secured and locked.
The Oar
The oar is long, heavy and your responsibility. Each oar is individual and has a number on the shaft close to the handle. You must make sure that you have the correct oar for your rowing position. As soon as you are in the gig, the Cox will instruct the crew to locate their oars and lift them into a vertical position (shipping) with the blade uppermost. Hold your oar firmly with its shaft between your knees.
Holding the Oar-Hold the handle of the oar with both hands, the hand nearer the end of the oar should be under the handle with the palm facing upward. The hand nearer the side of the gig (gunwale) should be on top of the handle with the palm downward.

Thole Pin
Each position will have two “pins”, One “soft” one “hard”. The soft pin is positioned in the aft hole, the hard in the forward hole. The hard pin takes the strain during the stroke and the soft pin is designed to break if you “catch a crab”.
Exmouth Gig Boats
Rodney Bey
Our first boat “Rodney Bey” was built in Devoran, Cornwall in 1995 by the late Ralph Bird. Ralph built the Gig for Helford River Gig Club where she was named ‘Helford’. In 2013 Exmouth purchased ‘Helford’ and re-launched her as ‘Rodney Bey’ after the beach that is only visible at low tide near Orcombe Point.

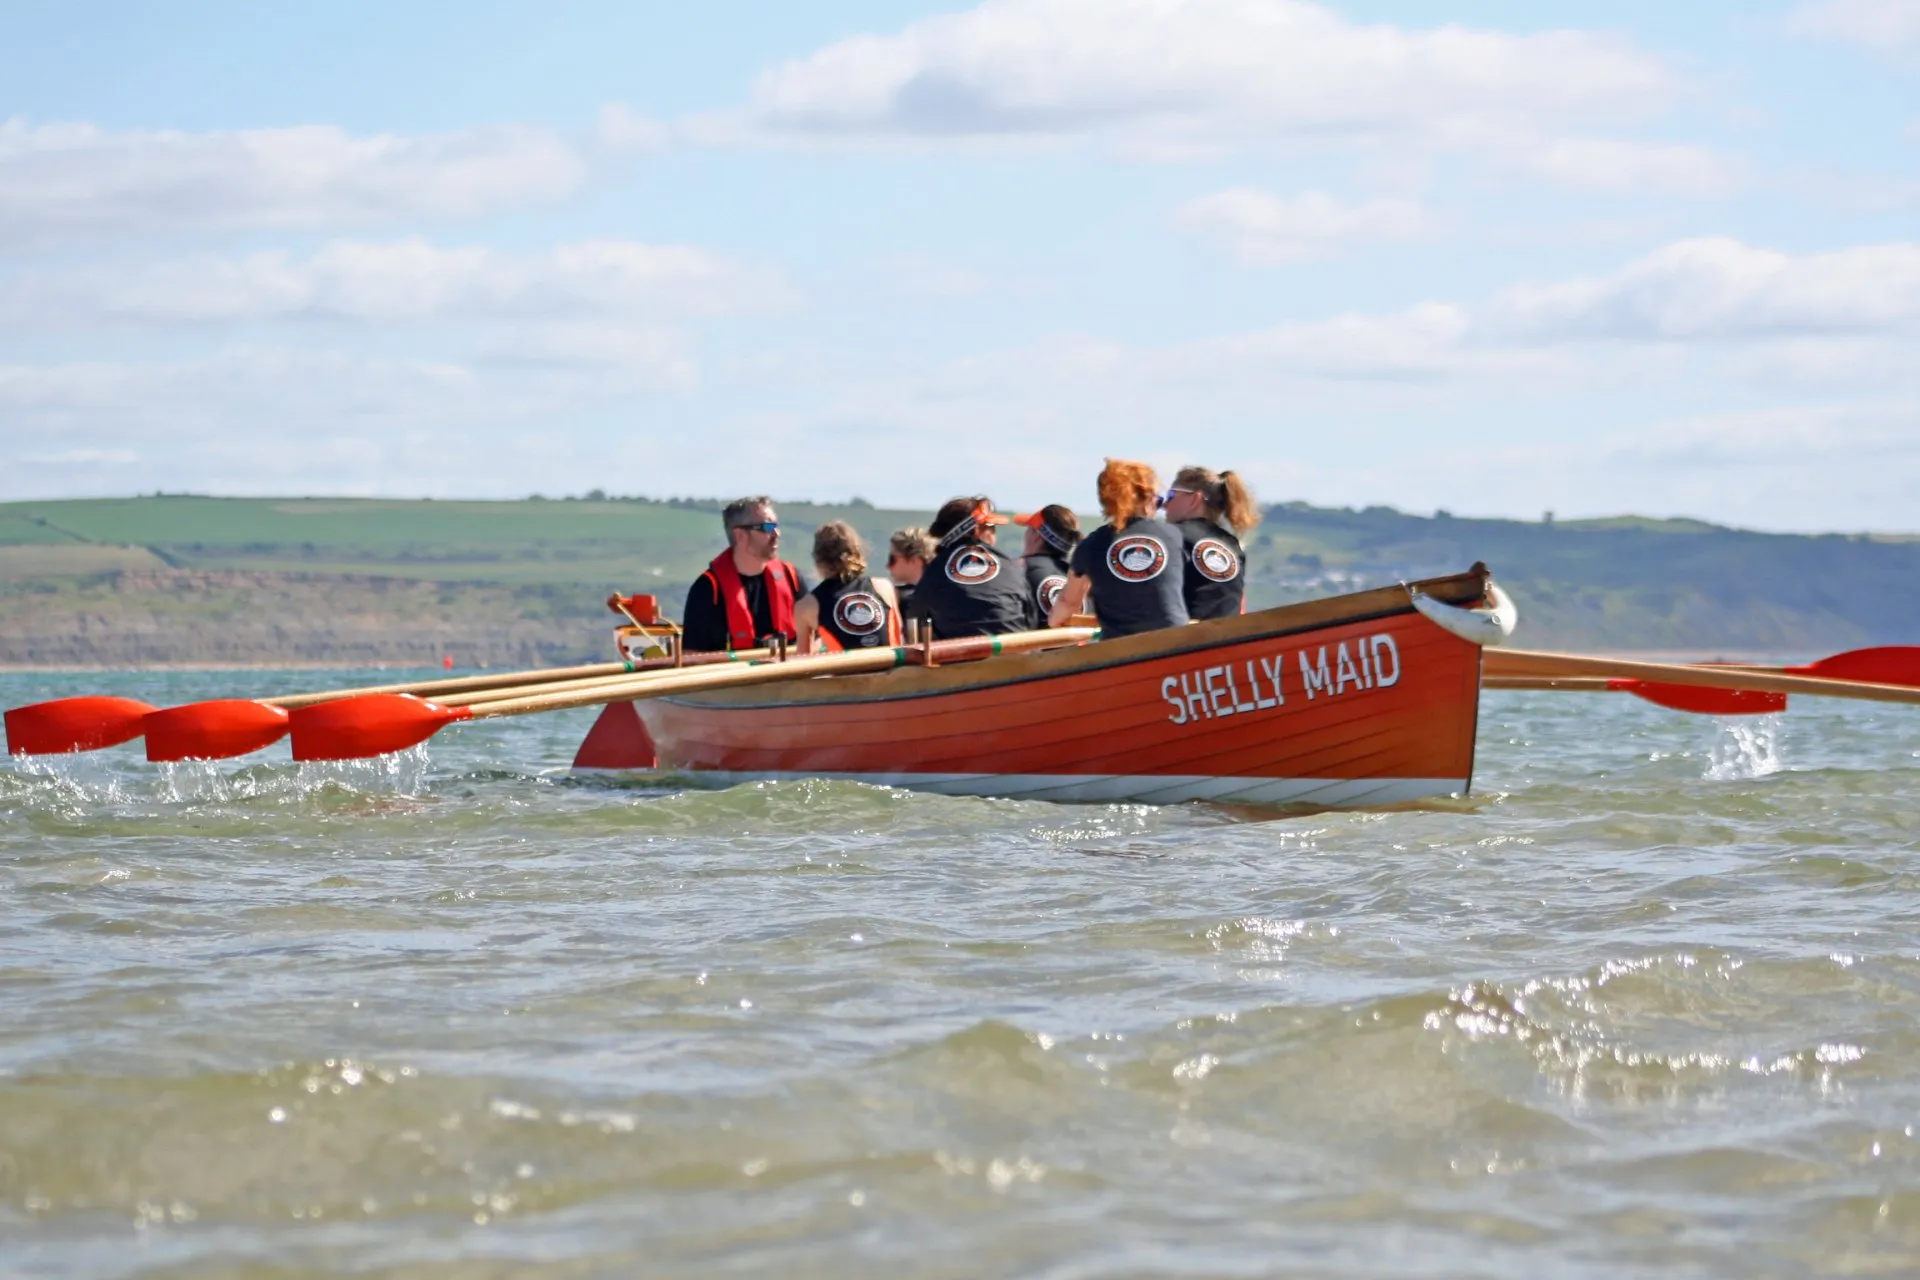
Shelly Maid
Our second boat, “Shelly Maid”, was commissioned in 2017 and built by boat builders Louis and Maurice Hunkin from Fowey, Cornwall. Named after the beach where the club launches “Shelly Maid” is the clubs premier race boat.
Avocet
Finally, the club owns a plastic training gig; “Avocet”. Much like the wading bird which shares its name “Avocet” is robust, hardy and spends most of her time on the estuary. The almost Exmouth Gig Rowing indestructible boat is used to give beginners their first taste of gig rowing as well as general training.
AUTHORITY TO LAUNCH
Launches of the gig are to be authorised by a committee member – this authority can be devolved to the Coxswains to facilitate club and extra sessions.
Before launching the existing conditions on the beach, slipway and at sea (tide and weather/swell) must be considered and alongside forecasted weather conditions for the next 6/12 hours and be in full agreement for the launch to proceed. If there are any doubts, then the launch should be cancelled.
Boundary Conditions
The following guidelines have been set after consultation with the club coxswains and set to the most conservative level fed back to the committee. If conditions exceed the parameters below then the session(s) may need to be cancelled. Coxes may wish to use their judgement if these conditions are borderline, but it is recommended to cancel if these parameters are met.
The committee will always support coxes cancelling sessions on the grounds of safety. Bear in mind conditions can change rapidly on the water and getting home against a strong wind and / or tide could put the crew at risk.

Maximum Wind Speed
30 km/hr or 18mph or 16 knots
Gusting 40km/hr 24mph or 21knots

High Tide
4 Metres*

Minimum Visibility
You must be able to see Dawlish Warren from Exmouth Dock Entrance
There are no set guidelines on minimum temperatures, but sessions should be cancelled if
there is ice forming on the slipways.
*The maximum tide of 4m is not just the tide height but the time within the cycle of the session will take place e.g. a spring tide can be fine if the session is at high water. The danger to crews is the flow between tides.

Final Call
Members should be mindful that the final decision to launch is down to the cox. If the Cox is uncomfortable in launching due to weather conditions, the ability of the crew to row safely or any other reason that makes them uncomfortable then they have the full backing of the committee NOT to launch.
Individual members may also abstain from rowing due to similar reasons. The committee will back the rights of the individual to do so, and other members should recognise that others may have a lower threshold of risk.
PREPARATION FOR LAUNCH
There should be a full crew available prior to launch (6 rowers & 1 coxswain). This is also important for the lifting of the gig. No persons under 16 should lift the gig, however, they are permitted to “drive” the trolley, therefore, they can make up one of the minimum requirements of 7 persons.
Always remember that a new gig costs more than £32,000 to build so it is important to take extreme care at all times to avoid damage.
The minimum equipment required for launch is a VHF radio, Lifejackets (enough for all non-rowing crew AND all under 16’s), 2 launching trolleys, first aid kit and a bailer.
Prepping the Boat
- Ensure that all straps are unclipped and released from the cover – including those at the bow and stern.
- Starting at the bow, roll the cover evenly towards the stern which will require one person on each side.
- When at the stern take the rolled cover off the gig and store safely away from pedestrian walkways.
- Remove the cover frames and batten supports and store safely with the cover.
- Lift the stern floorboard and firmly insert the drainage bung ensuring a tight fit.
- Fit and tie the seat covers securely.
- The gig is now ready to be lifted onto the launch trolleys.
Lifting the Gig
Gigs are heavy craft and lifting can potentially cause back injuries. Persons under 16 years of age should not be involved in lifting the gig.
- One person (either the cox or trolly driver) must take charge of the lift and be responsible for “counting” the lift.
- When lifting it is important to stand facing square to the hull with feet slightly apart and your weight evenly distributed. Hold on only either to a thwart (seat) or a strengthening strut (never the gunwale or top of the boat) to lift. During the lift, take the weight using your knees to take the strain, keeping your back straight and avoid twisting whilst lifting.
- One person will be required to take charge of each launch trolley.
- Lift the stern first on to a trolley, ensuring that the keel sits firmly on the support.
- At this stage the gig becomes unstable, so it is important to have sufficient people on each side of the hull to keep the gig level.
- Lift the bow onto the front trolley ensuring that the bow sits firmly on the support.
- With one person in charge of each trolley, the remainder of the crew should support the gunwales ensuring that the gig remains stable and level. This reduces lateral stress on the gig and helps prolong its life.
Manoeuvring the Gig
- Manoeuvre the gig as necessary to the water.
- Take care when travelling along the road or beach using trollies, do not go faster than a slow walk.
- Be courteous to other beach, slipway or road users and stop and let them pass as necessary. Exercise care whilst manoeuvring the gig to the slipway or ramp being aware of parked cars, pedestrians, lamp posts, benches and refuse bins etc. In particular sufficient people must be available to guide and control the speed of the gig down any incline.
- Be aware that the gig can “move” on the trolleys, stop and reposition as necessary.

LAUNCHING THE GIG
- Always remember beach and slipway etiquette as other users may be present.
Exercise caution as the surfaces may be slippery or, if on the beach, conditions under foot can be uneven and soft. - Re-check that the bung is correctly inserted.
- Move the gig with the stern trolley wheels into the water. If you go too deep it might cause the trolley to float up under the gig making it difficult to remove.
- Acting on the count, lift the stern and remove the trolley, the stern may now be afloat.
- Manoeuvre the gig further into the water and lift the bow off the trolley. Keeping firm hold, bring the bow of the gig ashore.
- Stow the launch trolleys making sure that they do not obstruct other beach or slipway users and will remain clear of any incoming tide.
- Install the thole pins and, if required, side fenders.
The thole pins (one hardwood, one softwood) are inserted in the holes on the opposite side to the rowing position seat. The hardwood pin fits in the hole towards the bow, the softwood pin in the aftermost hole (remember – Soft to Stern – S to S). Do not push the pins in too firmly. Spare pins should be placed throughout the gig in case of breakage whilst rowing. Please be aware that there may be specific pins for specific positions, if unsure consult the coxswain.

PREPARE TO ROW
At times when the tide is strong it can be particularly difficult to manoeuvre the gig away from
the beach/slipway
Remember – the coxswain is in charge, so it is important that you respond to his or her demands as quickly as possible!
Getting into the gig
- The coxswain should board first and, if possible, with dry feet!
- The crew should board one at a time in rowing order – Stroke first and Bow last.
- Walk along the centre line of the gig to your rowing position to keep stability and reduce stress on the gig. Avoid when possible, boarding the gig over the side. If this does happen, please, try and stand into the centre of the gig to avoid it rolling and tipping.
- Remove sand (or mud) from feet, particularly sand as it acts like an abrasive on the floorboards and stretchers.
Preparation
- Sit down in your rowing position as soon as possible, facing aft (towards the Coxswain).
- Check that the foot stretcher is correctly placed and comfortable for you before you commence rowing.
- Lift (ship) the oars in order into a vertical position and await instructions from the Coxswain.
- In windy or rough conditions, the Coxswain may instruct to fend off or back water as soon as everyone is safely in the gig and before you have had an opportunity to adjust your stretcher.
- It is most important that you react immediately to the Coxswain’s instructions.
- If the crew is instructed to fend off using the oars, try to use the shaft of the oar and avoid using the blade.
- Your hands should be approximately one hand width apart – for racing crews you may be instructed to place them further apart.
Shore crew
Shore crew, when available, should meet the gig at the water’s edge and ensure that it is sufficiently beached.
If the gig needs to be repositioned or pulled further up the beach as crew disembark it is vital that they announce this intention and do not move the gig without warning whilst rowers are standing up. Such a manoeuvre could cause crew to fall into the gig or even fall overboard.

Crew Change
- The gig will be beached, usually bow first, onto the shore. Oars should be “crossed” so that they do not slide overboard.
- The coxswain will instruct the crew to disembark the gig. Once again, the coxswain may remain
in the gig to “hold” it in position - The next crew should board the gig in the same manner as described above.
Recovery of the Gig
The recovery is generally the reverse of the launch procedure. Once the bow is on the first trolley the gig should be “walked” up until the stern grounds. It is difficult to insert the stern trolley at this point as the trolley floats and has to be forced under the keel. It is, therefore, preferable to lift and carry the stern of the gig up the beach/slip for about 6-10 feet. This makes it much easier to insert the rear trolley as it will not float. The bung should be removed as soon as the gig is on the trolleys to allow water to drain as
soon as possible. Ensure the trolleys are properly inserted once clear of the water, if necessary, stop and
reposition.
ROWING
Technique
Ready to Row
- Hold the oar with the blade out of the water and the curve of the blade towards the stern. When you “Ship” the oar always try to lift the leather over the gunwale and try to avoid “bumping” it over as this damages the leather.
- The middle of the leather on the oar should be on the gunwale between the thole
pins. - Straighten your arms, pushing the oar handle away from you.
- Lean forward as far as possible
- Tilt the top edge of the blade towards the Cox at an angle of approximately 10-20°
off vertical.
The Stroke
- Put the blade in the water so that the whole blade is just covered – “The catch”.
- Keeping your arms straight and pushing against the stretcher with your feet pull backwards – “drive”.
- Breathe out during the drive.
- The blade of the oar should now be vertical in the water.
- Lean backwards and pull the handle towards your chest, rather than your midriff.
- At the end of the stroke lift the blade out of the water – “the Finish”.
- Push the handle away from you, straighten your arms and lean forward – “the recovery/return”.
- Breathe in during the recovery/return.
- Always make sure that the leather on the oar is in contact with the gunwale – never on the unprotected wooden part of the oar.
- Do not rush the return as this is your best chance to breathe and recover.
Feathering the blade
- This is when the oar is rotated so that the top edge of the blade is tilted towards the bow during the return of the stroke.
- At the end of the stroke, roll the top of the oar handle towards your body for the return.
Take care not to feather before the end of the finish of the stroke otherwise you will “catch a crab”.
Instructions from the coxswain
Holding Water
- Put the oar blade into the water so that it is vertical.
- Hold the oar firmly so that it remains at right angles to the side of the gig.
Backpaddle (or Backwater)
- This enables the gig to be rowed astern – useful in manoeuvring away from a slipway or beach, in a crowded harbour or whilst holding at the start of a race.
- With the oar blade vertically in the water, push the oar handle away from your body and lean forward.
- Lift the oar blade out of the water and lean back.
- The blade should be vertical or the top edge of the blade should be tilted towards the bow.
Other Commands
- “Easy Oars” Stop rowing.
- “Hold Water” Use the oar as a brake by holding it firmly in the water at right angles to the gig.
- “Fend Off” Push off or away using either your hands or the handle of the oar (never the blade)
- “Watch your Kit” React immediately to lift your oar blade or pull in your oar to avoid hitting an obstacle such as a mooring buoy or another boat.
- “Length” Longer strokes required, keeping the oar blade in the water for longer.
- “Rate” The number of strokes per minute (speed of strokes).
- “Timing” Individuals or crew concentrate on keeping time with the stroke rower.
- “Pressure/weight” Pull harder with more effort, i.e. Coxswain instructs “increase by 25% or 50%”.
Catching a Crab
This is when the blade of the oar becomes horizontal and gets “stuck” in the water. This usually
happens because:
- The blade was not vertical when you put it in the water OR
- You have tried to feather your blade too early before lifting it clear of the water.
If this happens you will need to respond quickly to avoid breaking a thole pin. Immediately lift the handle upwards and clear of the thole pins, try to avoid snagging your neighbouring crew members’ oars, retrieve the oar angle, replace between the pins and resume the rowing rhythm when possible.
ROWING PROCEDURES
Normal Rowing
Launch / Recovery Locations
Club sessions will generally launch from Shelly Beach. Those sessions requiring boats from the yard will generally use Belshers slipway. Alternatively, “the Gut” can be used on high tides. Exmouth Beach is generally used for our regattas (in front of the Old Lifeboat Station which houses Exmouth Rowing Club).
Boarding / Changeover
Club sessions and / or extra sessions will use Shelly Beach or Pirate Cove to change over crews. Alternatively, Exmouth beach can be used in calm conditions for regattas and intra-club events.
Normal Rowing Area
West and North up the River Exe as far as Turf Locks or East along Exmouth beach (not on large/spring outgoing tides). Refer to the appendix 1.
Potential Hazards
- Approaching the slipway too quickly
- Rocks/sandbanks/running aground
- Strong tidal currents
- Strong or strengthening winds, choppy or rough sea conditions
- Mooring or marker buoys
- Pleasure craft/windsurfers/jet skis/kite surfers etc
- Commercial shipping
- Swimmers
- Beach users
All members must ensure that they are aware of all the hazards and mitigations in place to reduce their potential impact / probability by reading and understanding the club risk assessment. This can be found in the Documents, Policies and Information section of the website.
Shore Crew
Those required to act as Shore Crew will be identified on the session planner. For Extra Sessions this may not be possible to facilitate and therefore the crew must be able to launch / recover without additional support.
One shore crew member shall be nominated by the coxswain who shall have a VHF radio. The
channel to be used will be agreed prior to launch (usually channel 5).
The role of the Shore Crew is:
- To aid the launch and / or recovery of the boat(s)
Advise the coxswain of any pertinent information especially hazards that might be on the beach on the return of the gig (e.g., sailing boats, swimmers etc). - Be an extra rower to recover a boat where a crew member has become exhausted.
Swap out broken equipment during a session e.g., retrieving a spare oar from the yard. - To act as the onshore representative during an emergency e.g., guiding paramedics to Pirate Cove to meet up with an injured crew.
- The Shore Crew is not required to remain on the beach throughout a session (especially in cold / wet weather) but must ensure that they can maintain radio contact and be able to return to the beach at a moment’s notice.
- The Shore Crew should ensure that they have read the Emergency Action plan to understand how to operate the radio and their role during an emergency.
Minimum Crew
1 Coxswain + 6 Rowers. In exceptional circumstances this can be reduced to 5 rowers with permission of a committee member.
The level of experience of rowers in the gig shall be carefully considered by the coxswain and tailored to the current weather conditions.
When there are new rowers in the gig there should ideally be 4 experienced rowers but at least 3 in the gig. At times of strong tide, it may be necessary to postpone new or inexperienced rowers for another day.
SAFETY EQUIPMENT
Safety equipment must be kept in good working order. Coxswains are responsible for checking they have the required safety equipment prior to any session taking part. Any damage, wear or utilisation of single use of safety equipment must be reported to the Safety Officer.
Lifejackets
Coxswain must ensure that they wear a lifejacket for every session. They must ensure that they use the groin strap. A spare lifejacket should also be taken.
Any additional passengers (pilot) MUST also wear a lifejacket.
Lifejackets must be checked on an annual basis by the Safety Officer. They can be checked more frequently if the Safety Officer deems it necessary. A full description of the tests carried out can be sought from the safety officer.
To operate the lifejacket, pull the ripcord down sharply. This will inflate the lifejacket. If the jacket fails to inflate OR requires topping up there is an inflation tube to blow into.
There is a whistle attached to each lifejacket which can be used to raise the alarm.

Carried in Gig
- VHF Radio (waterproof, floatable)
- Bailer
- Throw line.
- Also carried in a grab bag to be regularly checked:
- Throw Line (in throw bag)
- First aid kit (see 17.3 for a complete list of contents)
- Survival bivi bags x 6
- Orange Hand Smoke Flares
- Klaxon/sound signalling device
- Compass
- Laminated 1:25,000 map of usual rowing area
- A spare oar may be carried for use by the coxswain to hold the gig against the tide when beached.
On the Shore
- VHF Radio
- Mobile phone
Rowing at other Locations
When rowing at locations other than Exmouth and in areas not described in appendix 1, as far as practicable the guidelines set out in item 9.1 shall be observed. When rowing at other locations a committee coxswain shall be present and be responsible for running and organising the day/event.
If no committee coxswain is available to oversee an event at a location other than that set out in appendix 1 then, with the approval of the committee a single member can be designated to oversee the trip or event. They are to follow instructions as laid out in this session as well as any additional guidelines issued by the committee.
If attending an organised event the instructions of the local organisers shall be followed and there shall be an Exmouth Coxswain at the Coxswain’s meeting.
It is advisable to do some forward planning and research the area in which rowing is intended. Good sources of information are maps and charts, nautical almanac and seeking advice from persons who have previous experience rowing in the area.
REGATTA ATTENDANCE
Attendance at regattas is an important part of the club and will be encouraged.
When possible, depending on availability of personnel, rowers and coxswains, “normal” rowing in exmouth will continue on a regatta day. The normal sessions remain bookable through the booking system as usual and should there be insufficient people to hold the session, cancellations will be sent via email.
Members who wish to attend regattas should indicate this through the message board on the specific thread that relates to the event. Crews will be selected in accordance with section 12 and crews notified in advance if possible. Event running orders shall be made available to those members who wish to attend as early as practicable.
When rowing at a regatta a committee coxswain shall be present and responsible for running and organising the day/event.
If no committee coxswain is available to oversee a regatta, then, with the approval of the committee, a single member can be designated to oversee the trip or event. They are to follow instructions as laid out in this session as well as any additional guidelines issued by the committee.

EXTRA ROWING SESSIONS
Members are free to organise extra rowing sessions that do not appear on the booking system in accordance with the following guidelines. These sessions could be used to facilitate things like extra training or a “social row”.
- A single row within a session should not exceed 90 minutes, a session can have multiple rows. The session will remain within the club recognised rowing area as shown in this manual.
- Any person who wishes to organise an extra session should seek prior approval from a committee coxswain by completing the extra sessions form on the members section of the website. This is to ensure predicted tide and environmental conditions are suitable and to avoid clashes with things such as planned maintenance or other events, club or other events etc.
- Sessions shall be organised and notified to the committee via the email above a minimum of 48 hours before the requested start time. Sessions will not be organised more than 2 weeks in advance.
- Once permission is granted, there will be a notification on the message board to inform members of the session. This notification shall include expected finish time in case other members would like to “take over” the boat and organise their own extra session.
- A full crew is not required to start to organise a session.
- Each row shall be made up of a minimum of 6 rowers and a coxswain.
Each session shall have a “lead” member who will act as the contact with the duty committee and who is responsible for the organisation and the kit. There shall also be a recognised coxswain on each session, they do not have to be the “lead” member. - All those taking part in the session must be full members and should be listed on the message board or the session plan calendar.
- Should you need to cancel your place at an extra rowing session this should be done through the “lead” member in the first instance.
- The person who is organising the session is free to arrange the order of rowing as duration of each row (up to 90 minutes). They are also free to arrange crews how they see fit if more than 1 row is planned.
- In the 24 hours before the start of the planned extra rowing session a final go/no-go decision should be sought from a committee coxswain. The decision they make shall be final and will be based on tide, weather forecasts, ability and experience level of the crew and coxswain.
- “Lead” members are to have a “recovery plan” in place to ensure they have enough personnel to safely recover the gig to its storage. This may include extra members coming and helping out who are not rowing.
CREW SELECTION
Normal and Extra Sessions
The Duty committee shall be responsible for crew selection at normal sessions that are booked through the website.
Crew selection at extra sessions as arranged through the message board will be made by the person overseeing and running the sessions. Last minute changes and substitutions may be made at the discretion of the coxswain as required if there are late cancellations or if the environmental conditions dictate.
Extra session crews shall be pre-notified and published on the “Session plan” page. There is no requirement to pre-publish or give prior notice of these crews for normal sessions.
Regattas and other events
Crew selection for regattas and other events shall be made by the committee coxswains or a group that they nominate and deem competent (a selection committee), or the club captain. The selections shall be made based on a number of criteria that consider the following:
- Objective of the event
- Number of races or rows
- Ensuring all those who give prior notice of attendance get the opportunity to row
- Ability of oarsperson, as assessed by the selection committee/committee coxswain
- Availability of oarsperson
- Boat balance considering the whole crew
- Commitment to train on and off the water
- Eligibility (e.g. CPGA membership for Championship events or age category of the event)
The order of importance of these factors may vary depending on the event and amount of notice that is given.
Where possible, it is advantageous to give prior notice of these crews. Changes may happen if there are late availability changes, injuries or if environmental conditions dictate.
The decision of the committee coxswains or selection committee will be final.
BEST PRACTICE
Oarspersons
For the safety of all concerned, rowing equipment must be maintained in good order. If you notice any damage to any part of the gig, oars, cushions, or ancillary equipment report this immediately to the Coxswain and/or Committee Member or via the online form.
When the gig is placed in the water and before embarkation, check to ensure that it is in a safe and fully seaworthy condition and that all equipment is in working order.
- Check for leaks
- Check seals and bungs
- Check seats and stretchers for security
- Check rudder lines, steering mechanism and rudder in good working order
- Check oars and thole pins for damage
All rowers must comply with the health and safety guidelines set down by the Cornish Pilot Gig Association and be aware of the health and safety risk assessment document prepared by Exmouth Gig Rowing Club. This is available on the website in Members area under Documents, Policies and Info.
All persons participating in rowing must be in good health and before commencing any rowing must complete the club’s water sports readiness questionnaire.
Lifejackets must be worn by all U16’s, non-rowers in the gig and coxswains. Persons unable to
swim 50 metres shall not be permitted in any boat, in any role.
Rowers are advised to take drinking water with them in the gig to help prevent dehydration. Rowing is thirsty work, so it is most important to hydrate before, during and after rowing.
Dress to beat the cold and damp – several layers of clothing are more effective than one or two warm garments. The outer layers should be wind/waterproof. Bulky and heavy clothing and wellington boots should be avoided.
Rowers and coxswains should be aware of the dangers of exposure to the sun, the effects of which are increased when on the water. Caps/hats should be worn, and sun cream/sun block applied when appropriate.
Rowing should not normally take place after sunset. However, should this be necessary in open sea a safety boat must be in attendance and craft should be properly illuminated.
COXSWAINS
Authority to be a Coxswain
The committee shall determine whether an individual is capable of being a coxswain.
It may well be that a person is deemed to be competent on one day but not another. Due consideration shall be given to the weather, tide and local conditions as well as the level of experience of the crew. For example, a person may be able to cox on a fine day with slacktides and a good crew but not if the crew will require some tuition or if the weather / tide were less favourable.
Coxswains shall be graded in accordance with 14.4
Members who cox without holding the required level to do so automatically contravene this authority and risk discipline action being taken against them.
Responsibility of Coxswain
All Coxswains shall satisfy their Safety Advisors and the committee that they are in good health with adequate vision and sound hearing. No person who might be subject to epileptic fits or blackouts shall steer a gig. In cases of doubt medical advice should be sought.
- Coxswains are responsible for the safety and welfare of all members of the crew and any
passengers in the gig. - Coxswains shall assess the weather conditions and rowing ability of the crew members.
- Coxswains shall ensure that the whole crew, including themselves, are suitably dressed and adequately protected for the conditions likely to be met.
- Coxswains shall occupy the Cox’s seat, or in a position that will best enable them to safely carry out their task.
- Coxswains only shall be in charge of the VHF radio whilst afloat.
- Wherever possible, Coxswains should also have a mobile phone available.
- Coxswains shall wear a lifejacket (meeting requirements BS3593) or buoyancy aids whilst afloat. Without exception all Juniors (U16’s) in the boat shall wear a lifejacket.
- Coxswains of designated, set Junior crews (under 16) who go afloat unsupervised on a regular basis shall have an approved Enhanced Criminal Records Bureau Disclosure (now Enhanced Disclosure & Barring) check.
- Coxswains must be aware of the dangers and symptoms of hypothermia.
Steering a gig, either in training or a race, is a highly responsible role. The Coxswain has responsibility for steering the gig. Commands must be given firmly and discipline exercised. Coxswains must learn and develop the following knowledge, and adhere to these procedures:
- Learn and use commands for boat control both on and off the water. Use them correctly, clearly and instinctively.
- Know how to use a VHF radio and understand radio etiquette
- Understand the commands and signals of other water users.
- Understand and carry out safety procedures and comply with regulations applicable to the waters in use, especially those relating to right of way, sailing craft, powerboats, jet skis, commercial shipping and swimmers etc.
- Understand local navigation rules of the water.
- Keep well clear of commercial shipping.
- In unfamiliar waters, become acquainted with local regulations and practices and of the existence, nature and location of particular hazards.
- Recognise and respect the rights and needs of other water users.
- Be conversant with the safety and rescue procedures in case of an accident or
emergency. - Watch out for swimmers at all times.
- Watch out for floating debris which may pose a risk to the gig.
- Ensure that the crews are using safe rowing equipment.
- Be aware of current and forecast weather and water conditions and arrange an outing to avoid any potential danger as a result of a change in conditions.
- When rowing away from home water the Coxswain shall ascertain the local code of practice, and at regattas any special traffic and racing rules must be observed and fully explained to the crew(s).
- Coxswains of junior crews should be aware that youngsters are unable to generate a high level of body warmth so must ensure adequate clothing for protection.
- Coxswains should be aware of life-saving and resuscitation techniques.
- Coxswains shall notify a member of the senior committee following an accident or incident and complete the club accident book when appropriate.
Coxswains and Coaches of beginners, novices and juniors have an added responsibility. Those new to the sport are more likely to concentrate on their own rowing to the exclusion of fellow crew members and more likely to be unaware of approaching danger. Beginners must never be allowed on the water without
experienced supervision.
Coxswain Training
Novice Coxswains will receive theory and practical training. This will be “in the classroom” and at sea by Full / Senior coxswains, and with regard to varying weather conditions likely to be encountered.
In-house training will be provided to those who express an interest in becoming a coxswain and who demonstrate the ability and qualities required to perform this task. Coxswains who have previous experience and who are new to the club and area will receive training in the local area and hazards and will be assessed afloat by a full or senior coxswain but may be fast tracked through the gradings.
Coxswain Grading
Club coxswains shall have a grading according to their ability to handle various stated of tide, weather and rowing ability. The grades shall be:
Duty Coxswain
In addition to the responsibilities below, duty coxswains organise the weekly club rowing and give the ok/no-go for any extra sessions or race training. If ok’d by a duty coxswain, individual coxswains still have the final say as to whether they feel it is safe for their crew to launch.
Senior Coxswain
Able to cope with all levels of weather and rower ability. These coxswains are permitted to hold “beginners sessions” and are pivotal to the delivery of classroom teaching and setting policy. Senior Coxswains can assess all lower grades of Coxswain.
Club Coxswain
Able to act as coxswain for “normal” club sessions and at regatta. Club coxswains can cox beginners with the permission of the committee coxswains. Club Coxswain cannot assess others.
Novice coxswain
New coxswains with limited experience who should be supervised by either a club or full coxswain.
A list of current coxswains and their current grading is available in the Documents, policies and information section of the members area of the web site.
Race Coxswain
Race Coxswain is a role unto itself and those that wish to do so need to have two years of coxswaining experience. They will need to attend all race briefings held by the race organiser and have a full understanding of the CPGA rules (and the Jurassic League rules if applicable). Any cox that wishes to race cox should make there intentions known to the Club Captain so the appropriate training can be put in place.
MEMBER RESPONSIBILITIES
Wellbeing and fitness
Prior to Rowing
When attending a rowing session, members should ensure that they are in a fit state to do so. Rowing is a physical activity and the sessions generally last for over 30 minutes. If you feel that you might be unable to fully participate in a session, please inform the coxswain. It may be that allowances can be made, and it will be possible to accommodate you still however if, for instance, the coxswain is planning to use your experience and fitness to compensate for a beginner keeping quiet could lead to safety issues.
During a Session
Should you start to feel unwell during a rowing session please inform the coxswain immediately. Any necessary steps can then be taken to ensure that you do not make yourself any worse during the session.
Participation
Helping Out
As you will be aware the gig is quite a large and heavy piece of equipment! Having extra hands available to help with the launch and recovery of the gig makes the whole process much quicker and safer. The club appreciates that you will not always be able to make the start of a session, or be able to stay to the end, it is expected that you will do your share of helping out with launch and recovery. We appreciate your help with this and it is only fair to do your bit.
Any members who regularly shirk this expectation will be spoken to by the committee. In extreme cases disciplinary action can be taken.
Normal Bookings
The club has a well organised and easy to use booking system. It offers email confirmation of bookings and also gives us the capability of sending messages to members should a session become oversubscribed or cancelled due to weather. It is, therefore, important for you to check emails prior to attending a session. The duty cox will also endeavour to update the members via WhatsApp.
We strive to accommodate all who request a row at every session. This can involve pre-planning to ensure experience levels are correct to allow for things such as strong tides. If you cannot attend a session, it is essential that you cancel it through the booking system if in excess of 48 hours before hand. Obviously unexpected things happen, if that is the case, please email exmouthgigclub@gmail.com to notify us and include your name.
By booking and not turning up you could jeopardise the whole session if there are not enough people to launch, or, if oversubscribed, someone may have been refused a session. Regular nonattendance could result in “a word” from the committee and in extreme cases disciplinary action.
Extra Sessions
Should an “extra session” be organised and advertised on the message board, members are to book on the message board in accordance with guidelines as laid down on there. The guidelines for setting up and organising an extra session are set out in section 11.
All correspondence in relation to these sessions should be on the message board including late cancellations. As detailed in 15.3, by booking and not turning up you could jeopardise the whole session if there are not enough people to launch, or, if oversubscribed, someone may have been refused a session. Regular nonattendance could result in “a word” from the committee and in extreme cases disciplinary action.
Code of Conduct
All members need to agree to the club rules when they apply for membership. These club rules are as follows:
Respect – I will treat other members and public as you would expect to be treated regardless of age, gender, ethnicity or ability.
Consideration – I will show consideration and avoid causing offence through language or actions which may bring the club or the sport into disrepute
Safety First – I will always adopt a safety first attitude. Looking out for myself and fellow rowers. I will follow instructions during launch, rowing and recovery.
The clubs own constitution sets out how discipline, appeals and grievances are deal with in section 7. The pertinent clause being:
7.1. The committee reserves the right to discipline any member who:
- Seriously contravenes the rules of the club of those policies adopted by the club such as CPGA policies.
- Brings the club into disrepute.
- Receives 3 written warnings regarding “behaviour not becoming of a club member” (i.e. not behaving in a fair manner or “doing their bit”).
TRANSPORTATION OF GIGS
Disclaimer
Every effort is made to ensure that the information in this manual is accurate and reflective of best practice at the time of publication. It is the users’ responsibility to ensure that such information and guidance is up to date before acting upon it.
Exmouth gig rowing club is not responsible for damage caused to vehicles, trailers or gigs, nor
injuries to personnel during the transportation of gigs.
Trailer Towing Vehicle Drivers
The safe transport of a gig is the responsibility of the person(s) towing the trailer and gig.
All members who tow the club trailers must be conversant with the requirements for safe and legal movements of boats and trailers by road. The secretary/ treasurer must check that there is adequate insurance cover in place for the equipment
Before each towing movement the person towing must check that the gig trailer is fully operational and roadworthy, including correct tyre pressures and that all moving parts, supports and braces are lubricated for ease of adjustment, and that sufficient ratchet retaining straps and other ties are available.
Those volunteering to tow club equipment are fully responsible for ensuring that they are capable and competent to do so and that their vehicles are fully roadworthy and suitable for towing. Those volunteering to tow the gig trailer must ensure that they and their vehicles are comprehensively covered by their own insurance and that, if necessary, their Insurers have been advised.
If the towing driver is not the owner of the vehicle, he/she must ensure that they are fully covered by their own Insurer to drive that vehicle and that they have the full agreement and permission of the vehicle’s owner to do so.
When towing trailers, drivers must ensure that:
- The towing load of the vehicle is within the manufacturer’s limits.
- The trailer is fully operational and roadworthy.
- There are adequate ties, ratchet straps and rear projection markers available.
- All drivers must be aware of the maximum loading of the trailer.
- The load is secure and any objects within the trailer are also secure (Oars)
- In the event of a rear projection in excess of 1.0m past the light tailboard that there is an extra rear light available for use during hours of darkness or a rear projection sign in daylight hours.
- They are fully aware of the nose weight of the trailer.
Top Ten Trailer Checks
- Check you have the correct licence and insurance to tow the load.
- Check the vehicle is appropriate for the load, length and type of trailer
- Check the total weight of the load being towed and the loading on the tow hitch.
- Check the boats and load are positioned to ensure even weight distribution and a low centre of gravity.
- Check the ties are suitable, in good condition and secured to avoid slackening and slipping – See ‘double strapping’
- Check the limitations of the tow vehicle in the vehicle handbook – the towing weight & towing hitch loading. Check the load is securely tied to the trailer at regular intervals.
- Check the tyres are in good condition and at the correct pressure.
- Check all the lights are in working order – carry spares.
- Check the load is securely tied to the trailer at regular intervals.
- Check the weather forecast for high winds and icy conditions.
Relevant Legislation
The rules about towing a trailer with a car changed on 16 December 2021 – see details.
If you passed your car driving test from 1 January 1997, you’re now allowed to tow trailers up to 3,500kg MAM.
Check your car’s handbook to find out its gross train weight (GTW). This is the total allowable weight of the car plus the trailer plus the load.
If you passed your car driving test before 1 January 1997, you are not affected by the change.
The law relating to the transportation of abnormal loads is complex. There is an exemption that applies only to oar propelled racing boats that removes some of the requirements that apply to abnormal loads in general.
The latest regulations are contained in the Road Vehicles (Construction & Use) Regulations 1986: coded ‘1986 No 1078’. The relevant projection information appears on pages 109 – 113 covered by Regulations 81 & 82 and Schedule 12. Towers should ensure that they read and understand the relevant section.
Tiredness Kills
Avoid Driver Fatigue – Falling asleep at the wheel is the cause of around 20% of accidents on
long journeys on trunk roads and motorways.
- Try to get a good night’s sleep before driving
- Share driving if possible
- Plan to stop for 15-minute break every 2 hours
- Stop in a safe place when you feel tired
- Drink a cup or two of strong coffee followed by a short nap, once you have stopped somewhere safe
Never drive under the influence of alcohol or any other substance. Check medication instructions carefully.
EMERGENCY ACTION PLAN
Action In Case of Accident or Incident
In the case of an accident in which there has been damage to a gig or equipment and/or an injury has occurred, the Coxswain must complete the Online Accident form which will be sent to the Safety Officer. The Coxswain must also report any incident to the Club Chairman and Safety Officer, also to the parent/guardian of any junior who may have been involved.
Raising the Alarm
The VHF radio should be the primary method of communication when afloat, call the
coastguard on channel 16.

Channels
- Channel 6 – used communicate between boats or to the Shore Crew. This is an open channel and is often used by others for similar reasons.
- Channel 16 – used to contact the Coastguard and reserved for emergencies only.
Use of the Radio
When using radio communication, remember these best practices to go by and which radio faux-pas to avoid!

DO KNOW THE LINGO
- Over – I’ve finished speaking
- Say again – Please repeat your last message
- Stand by – I acknowledge the transmission but can’t respond right now
- Go ahead – I can respond, go ahead with your message
- Roger – Message received and understood
- Affirmative/Negative – Yes/No
- Out – Conversation finished; channel clear for other users
A typical exchange could be:
“Shore Crew, this is Shelly Maid. Over.”
“Shelly Maid, this is Shore Crew. Go ahead.”
“Shore Crew, this is Shelly Maid. I am heading for Pirate Cove for a crew change. Over”
“Shelly Maid this is Shore Crew. Received. Out.”
Mayday Call
To be used when there is imminent danger to life or to the continued viability of the vessel itself.
An example call would be:
“MAYDAY, MAYDAY, MAYDAY.
This is Avocet, Avocet reporting a medical emergency.
We are 100 metres Southwest of the River Exe Café *.
We are a Cornish Pilot Gig, Orange and White in colour. We have a rower suffering a severe asthma attack. The casualty requires immediate evacuation to hospital.
Over.”
*several different ways to estimate your location can be found in section 17.7
If you don’t get an immediate response to a MAYDAY call, wait for one minute (UK) before
repeating it.
Pan Pan Call
You can replace the words “Mayday” with “Pan Pan” when an emergency does not pose an immediate danger to anyone’s life or to the vessel itself – e.g. broken oar means return to shore is proving difficult.
Estimating Location
This is extremely useful for the coastguard to locate you. There are a couple of methods that can be used to do this – but situations (such as capsize) may make this difficult.
Map and Compass
- Use the map to identify a landmark on shore – in this case Orcombe point
- Point the compass towards the landmark
- Turn the bezel until the red orientation arrow sits under the red end of the floating
- compass needle
- You can then read off the reading from the index line
- Use the map and the 1:2500 scale on the compass to estimate distance.
Anatomy of the compass

- Base plate – this line can be used to line up where you are and where you want to go to.
- Compass housing – within the rotating bezel there is the magnetic needle (see number 3 for details). Around the bezel are marked 360° of a circle – these will give you your bearing.
- Compass needle – it is floating in a liquid (usually alcohol) so it can freely rotate. The red end always points to magnetic north.
- Orienting lines.
- Orienting arrow – this is fixed within the compass housing. When you come to take your bearing – you will align the compass needle with this arrow.
- Index line – on some compasses, as shown here, it is a fixed black line within the bezel, on others it could be an arrow on the base plate. It is at this mark that you take your compass bearing.
- Direction of travel arrow – Point this at the landmark you want to give the reading from.
- Compass scales – these can help you measure distance.
Map Grid Reference
This is the simplest technique requiring the least amount of equipment. It may also be the least accurate as it requires a little bit of estimation BUT it will help narrow down the search area for the emergency services.
Four-Figure Grid Reference
On an OS map each grid square is 1 km x 1 km or 1 sq km. When you give a grid reference, always give the easting first, followed by the Northing.
“Along the corridor and up the stairs”.
Four-figure grid references can be used to pinpoint a location to within a square measuring 1
sq km.
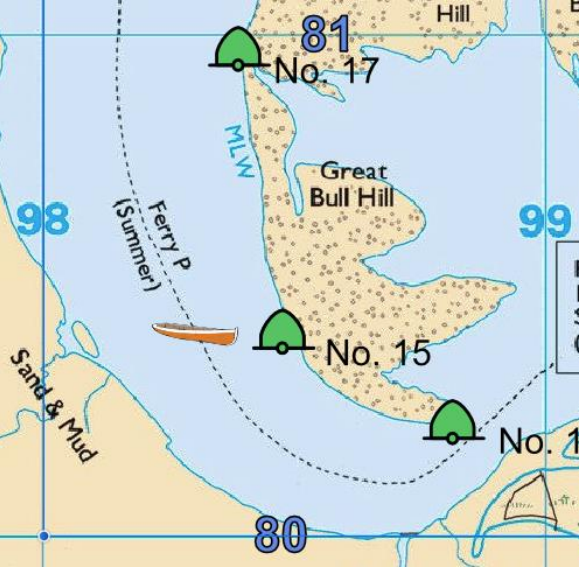
- Start at the left-hand side of the map and go east until you get to the easting crossing through the bottom-left-hand corner of the square you want.
- Move north until you get to the northing crossing the bottom-left-hand corner of the square you want. This is your four-figure grid reference (or GR).
- In this case, the gig is located at GR9880.
Six-Figure Grid Reference
To narrow down the reference further imagine that each grid is divided into 10 tiny squares. The distance between one grid line and the next is divided into tenths.

- Find the four-figure grid reference but leave a space after the first two digits.
- When you get to the easting at the left-hand side of the grid square you want, keep moving east and estimate how many tenths across your position lies.
- Place this number after the first two digits.
- Next, move north from the bottom-left-hand corner of your grid square and estimate how many tenths your symbol is from this point.
- Put them together to create a six-figure grid reference.
- In this case, the gig is located at GR983804.
As part of a distress call this would be worded as “We are at Grid reference Nine, Eight, Three, Eight, Zero, Four.”
Mobile Phones
Coxswain(s) should take a mobile phone with them on the gig whenever possible as a backup for the VHF radios. Dial 999 or 112 from a mobile. Ask for ambulance or coastguard (coastguard will request lifeboat as required)
What3Words
To find you more easily in an emergency, many UK Emergency Services are encouraging you to share your 3-word address. What3words has divided the globe into 3m squares and given each one a unique 3-word address. It means everywhere can be located with just three words.
It can be used offline and requires no data to run.
Download from the App Store (for Apple devices) or Google Play (for Android)
What3Word Location
As an example ///commutes.scramble.shells will take you to the bow of Avocet when she’s
in her usual location on Shelly Beach.

To obtain the 3-word address for your current location click on the arrow in the bottom right corner.
Share your 3-word address (displayed in the white box near the top) over the phone to the call handler.
The emergency service can then coordinate a response directly to the exact location where help is needed.
As part of a distress call this would be worded as “We are at What3Words Reference, Commutes, Scramble, Shells.”
FIRST AID
Expectation from Members:
- Report any injuries to First Aiders or Club Officers.
- Report any deficiencies in First Aid cover or problems summoning emergency assistance to the club.
- Report First Aid and medical incidents to the club – via the online reporting form.
First Aiders
A list of first aiders can be found on the club website under the Policies, Documents, and Information section. Qualification(s) held are also shown. Additional First Aid courses may be run if the committee decides the level of first aid cover is inadequate for club activities.
First Aid Equipment
A basic first aid kit can be found in the grab bag for each boat. These contain:
- Plasters
- Small, medium and large sterile gauze dressings
- Sterile eye dressings
- Triangular bandages
- Crêpe rolled bandages
- Safety pins
- Disposable sterile gloves
- Tweezers
- Scissors
- Alcohol-free cleansing wipes
- Sticky tape
Should any of these be used for any minor injuries then please ensure that the online accident report is completed AND the safety officer so that they can replace the used item(s)

Hypothermia
Early signs of hypothermia include:
- Shivering
- Cold and pale skin
- Slurred speech
- Fast breathing
- Tiredness
- Confusion
These are symptoms of mild hypothermia, where someone’s body temperature is between 32⁰C and 35⁰C.
Should anyone be suffering any or some of the above symptoms on the water the following procedure should be followed:
- Cox to end the session immediately*
- Person experiencing symptoms to be dressed in all available layers and put in one of the orange survival bags.
- All wet layers should be removed.
- Return to shore as quickly as possible.
- Move indoors e.g. The Beach Pub or the cafe
- If possible give a warm drink.
- Monitor carefully.
- If there are no improvements in symptoms, then the patient should be taken to hospital.
*Coxswains, are more at risk of mild hypothermia during winter sessions than rowers. Therefore, rowers should monitor the cox carefully for the early signs. If any of these are being displayed the crew must take the decision to end the session.
Worsening Condition
If the patient’s temperature drops to 32⁰C or lower, they’ll usually stop shivering completely and may pass out. This is a sign that their condition is getting worse and emergency medical help is needed. Call 999.
Unconscious but Breathing
If a person is unconscious but breathing and has no other injuries that would stop them being moved, place them in the recovery position until help arrives. Keep them under observation to ensure they continue to breathe normally, and don’t obstruct their airway.
Unconscious and NOT breathing
If a person isn’t breathing normally after an incident, call an ambulance and start CPR straight away. Use hands-only CPR if you aren’t trained to perform rescue breaths.
Cardiopulmonary resuscitation (CPR)
Hands-only CPR
- To carry out a chest compression:
- Place the heel of your hand on the breastbone at the centre of the person’s chest.
- Place your other hand on top of your first hand and interlock your fingers.
- Position yourself with your shoulders above your hands.
- Using your body weight (not just your arms), press straight down by 5-6cm (2-2.5 inches) on their chest.
- Keeping your hands on their chest, release the compression and allow the chest to return to its original position.
Repeat these compressions at a rate of 100 to 120 times per minute until an ambulance arrives or you become exhausted.
CPR with rescue breaths
If you have been trained in CPR, including rescue breaths, and feel confident using your skills,
you should give chest compressions with rescue breaths. If you’re not completely confident, attempt hands-only CPR instead.
- Place the heel of your hand on the centre of the person’s chest, then place the other hand on top and press down by 5-6cm (2-2.5 inches) at a steady rate of 100 to 120 compressions per minute.
- After every 30 chest compressions, give two rescue breaths.
- Tilt the casualty’s head gently and lift the chin up with 2 fingers. Pinch the person’s nose. Seal your mouth over their mouth and blow steadily and firmly into their mouth for about one second. Check that their chest rises. Give two rescue breaths.
- Continue with cycles of 30 chest compressions and 2 rescue breaths until they begin to recover or emergency help arrives.
- If drowning is suspected start with the rescue breathes.
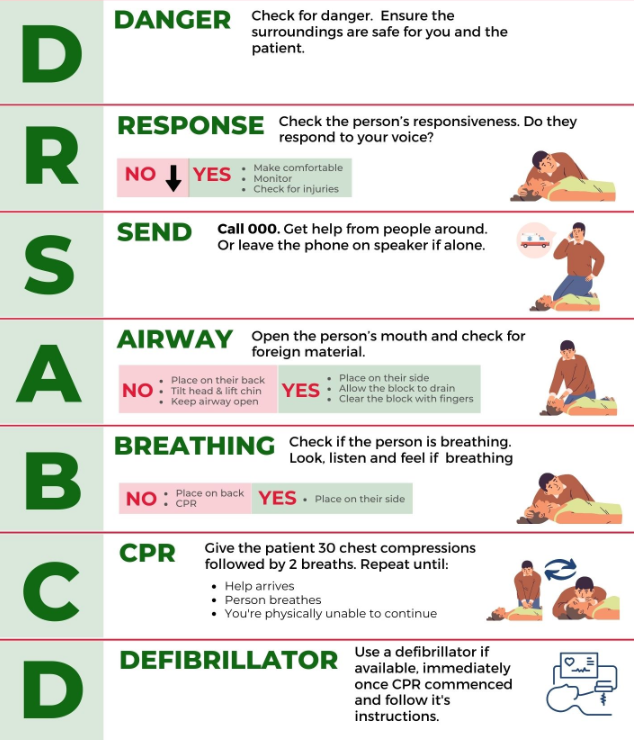
Automatic External Defibrillator (AED)
The nearest AED to the yard are shown below. The Exe Sailing club is the closest for Shelly Beach.
| Location | Distance from Yard | What3Words | Available |
|---|---|---|---|
| EDC Camperdown Depot | 161yds / 1 min | ///judges.mentioned.flicked | Mon – Fri 0830 – 1700 |
| Exe Sailing Club | 338yds / 3 mins | ///retrain.duck.conquests | Mon – Sun 0900 -1700 |
| Exmouth Rugby Football Club | 458yds / 4 mins | ///sparkles.ropes.chills | Always accessible |
If rowing along the seafront the nearest AED could be at the Lifeboat station (///trips.gives.flock) which is always accessible.
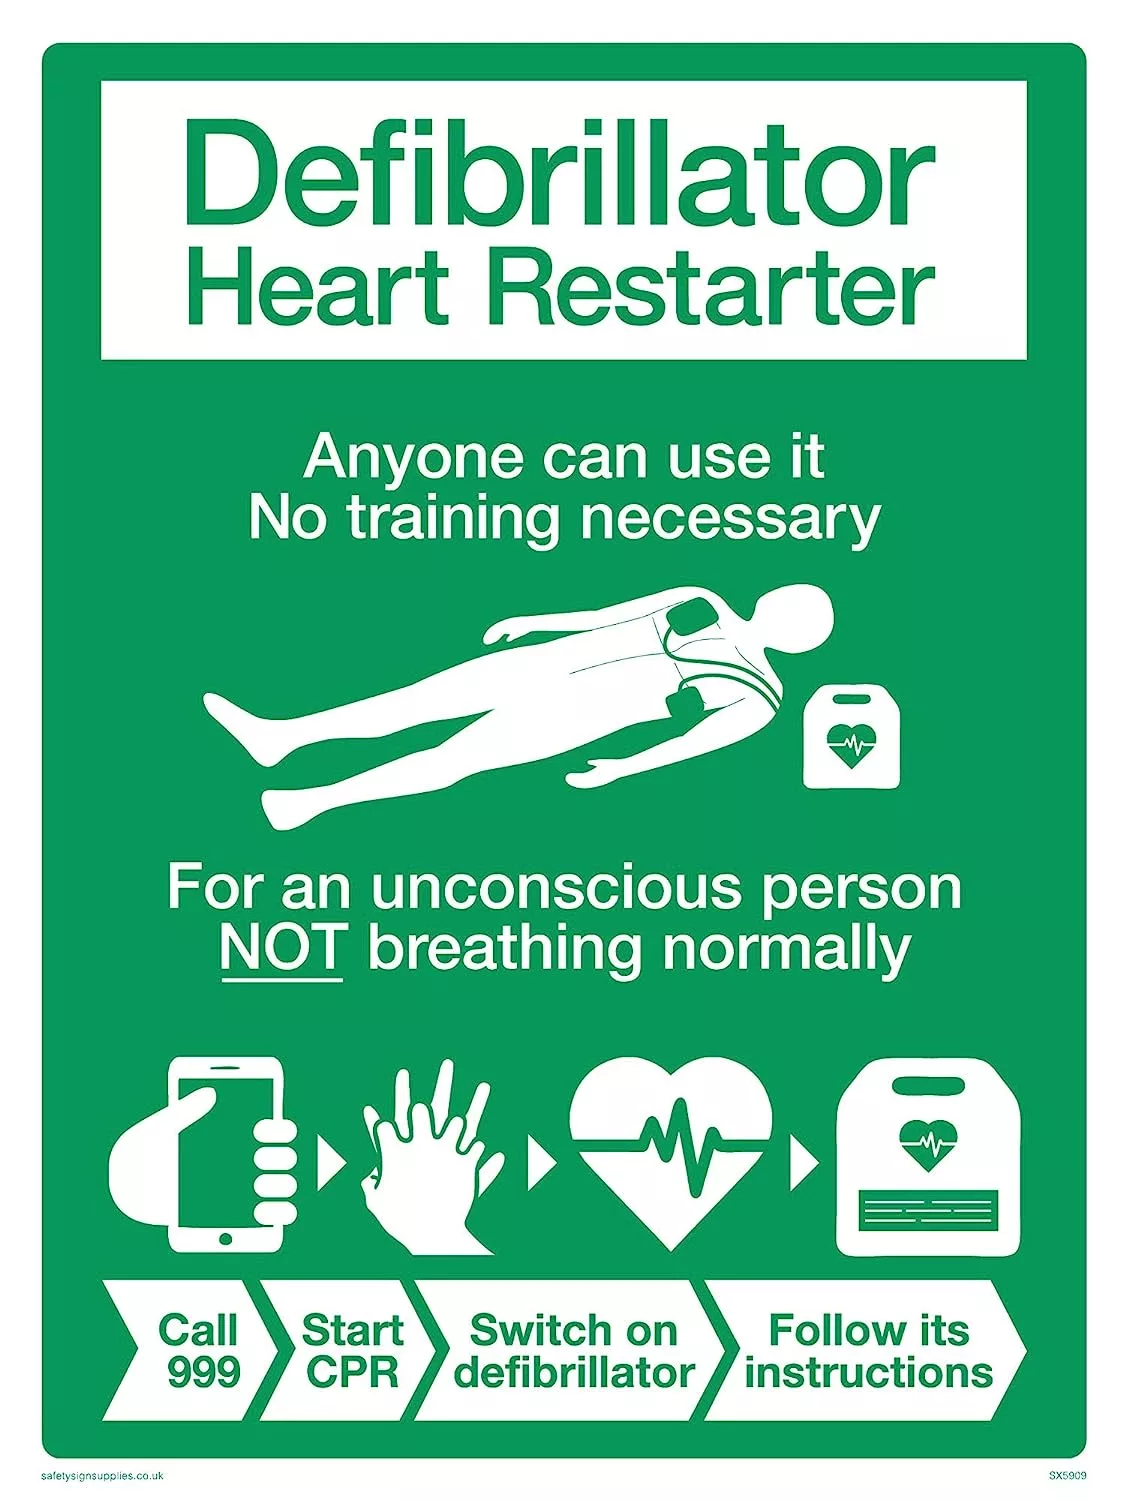
- Call for help
- Start chest compressions
- Send someone for the AED
- When the AED has arrived:
- Switch on the AED
- Follow the audible instructions from the AED while continuing chest compressions
- If CPR or an AED is used then the casualty will need further assessment as well as advanced medical care so MUST be taken to hospital, even if they appear to have recovered.
Recovery Position
If a person is unconscious but is breathing and has no other life-threatening conditions, they should be placed in the recovery position. Putting someone in the recovery position will keep their airway clear and open. It also ensures that any vomit or fluid won’t cause them to choke.

- With the person lying on their back, kneel on the floor at their side
- Place the arm nearest you at a right angle to their body with their hand upwards, towards the head (1)
- Tuck their other hand under the side of their head, so that the back of their hand is touching their cheek (2)
- Bend the knee farthest from you to a right angle
- Carefully roll the person onto their side by pulling on the bent knee (3)
- The top arm should be supporting the head and the bottom arm will stop you rolling them too far (4)
- Open their airway by gently tilting their head back and lifting their chin, and check that nothing is blocking their airway
- Stay with the person and monitor their condition until help arrives
Spinal injury
If you think a person may have a spinal injury, don’t attempt to move them until the emergency services reach you. If it’s necessary to open their airway, place your hands on either side of their head and gently
lift their jaw with your fingertips to open the airway. Take care not to move their neck.
You should suspect a spinal injury if the person:
- has been involved in an incident that’s directly affected their spine, such as a fall from height or being struck directly in the back
- complains of severe pain in their neck or back
- won’t move their neck
- feels weak, numb or paralysed
- has lost control of their limbs, bladder or bowels
Local Hospitals
The closest hospitals to the club can be seen by following this link.
Urgent Care
Conditions that can be treated at an urgent treatment centre include:
- Sprains and strains
- Suspected broken limbs
- Minor head injuries
- Cuts and grazes
The nearest Urgent Care Centre is:
Exmouth Health Centre, Claremont Grove, Exmouth, EX8 2JF (Note this is NOT OPEN AT WEEKENDS)

Accident and Emergency
An A&E department will deal with life-threatening emergencies, such as:
- Loss of consciousness
- Acute confused state and fits that are not stopping
- Chest pain
- Breathing difficulties
- Severe bleeding that cannot be stopped
- Severe allergic reactions
- Severe burns or scalds
- Stroke
- Major trauma such as a road traffic accident
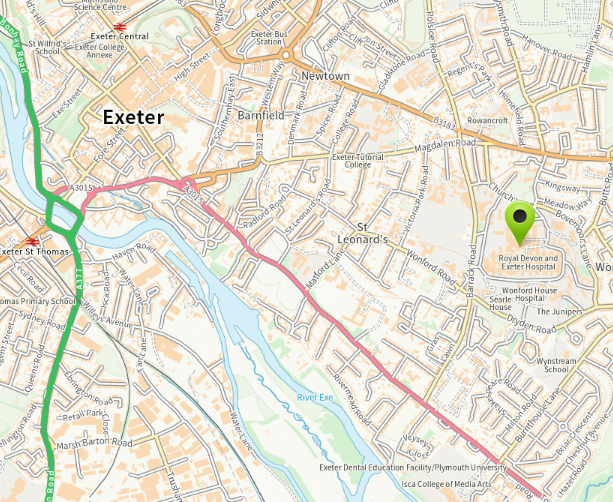
The nearest A&E department is:
Royal Devon and Exeter Hospital, Barrack Road, Exeter, Devon, EX2 5DW (24 Hours)
If in doubt – Call 999
GENERAL SURVIVAL STRATEGIES
Survival is the ability to look after yourself and other people in an emergency.
The principles of personal and group survival are the same. They require careful consideration. Survival in a deep-water emergency depends on the individual’s ability to use knowledge, judgement, skill and fitness to cope with the situation.
It is important to remain calm and where possible consider the following procedures.
Planned Entry into water
Abandoning the gig boat should be a last resort but maybe unavoidable. Try to stay in control
and before entering the water check:
- Availability of assistance.
- Establish who is in charge (the Coxswain is).
- Number of people in the group and their abilities.
- Availability of buoyancy and other aids.
- Any lifejackets are being worn and are correctly fastened.
- Environmental conditions.
- Removal of hazardous items of clothing.
- Method or means of survival.
- Plan entry carefully.
- Minimise risk and injury.
- Select correct method of entry for conditions.
Immersion
Immediately following entry:
- HELP and HUDDLE survival methods are valuable in any situation
- Float, Scull or Tread water in a relaxed manner.
- Put on / or secure Life Jacket.
- Hold on to Buoyancy aid for support and stay with the boat.
Personal survival
- Only swim when absolutely necessary
- It is essential to conserve body heat and energy.
- If you are alone use the HELP survival method
Group survival
- Appoint a Leader (Coxswain).
- Keep together.
- Stay with the boat.
- Supervise and look after the weaker swimmers.
- Use survival and buoyancy aids.
- Support each other (HUDDLE).
- Avoid danger and tiring action.
- Encourage each other.
HELP (Heat Escape Lessening Posture)
- If you are wearing a lifejacket you should adopt the HELP position to conserve energy and heat.
- Keep your legs together and straight.
- Press both arms against your upper body.

HUDDLE – With a Lifejacket
The Huddle position is useful for small groups wearing life jackets. It works on the same principle as the HELP position by reducing loss of body heat.
- Press the sides of your chests together.
- Press lower bodies together.
- Put arms around each other’s backs at waist level.

HUDDLE – Without a Lifejacket
- Hold on to the side of the gig.
- Use an oar as an additional floatation aid.
- Adopt the HELP or HUDDLE posture if possible.
- Stay as still as possible.
- Scull, float & tread water.
- THINK POSITIVELY
- Hold on to a buoyant aid (eg oar and boat).
- Keep body and limbs submerged.
- Avoid immersing your head in the water.
- Supervise and look after weaker swimmers.
- Encourage each other.
- Retain clothing.
- Swim slowly if you have to.
- Change position / stroke regularly to lessen muscle fatigue.
- Keep your eyes open.
- Breathe regularly and in a controlled manner.
- Attract attention by raising one arm above your head.
- Stay with the boat.
Signals in Emergency Situations
- Red Flares / Orange Smoke Signal.
- Slow and repeated raising and lowering of an outstretched arm to the side.
- Six blasts of a whistle (there is one attached to each coxes lifejacket) at 1-minute intervals.
- Shout.
MAN OVERBOARD PROCEDURE
The Safety Officer is to ensure the ‘Man Overboard Procedure’ drill is carried out annually. All crew members must be aware of this procedure and be able to perform this duty should the occasion arise.
- Shout ‘man overboard’ to alert the crew.
- Throw an inflated life jacket or fender to the Man overboard (MOB).
- Allocate a crew member to point at the MOB in the water.
- Keep pointing; don’t lose sight of the MOB.
- Prepare a throwing line.
- The Coxswain will bring the boat alongside the MOB, with the boat pointing into the wind.
- Throw the throwline to the MOB.
- The MOB should be told to hold the rope – pull the throwline in hand over hand.
- Once the MOB reaches the side of the boat two crew members (in the middle of the boat) should hook their arms under the arms of the MOB.
- The remaining crew may need to move to the opposing side of the boat to balance it.
- Lift the MOB into the boat.
Once securely in the boat the MOB should remove all wet clothing, replace with spare kit from
fellow rowers and get them into the survival bag. Head for shore and look out for signs of
hypothermia (as outlined in 18.4)
RUNNING AGROUND
Running aground represents a high chance of injury to the crew. Therefore, coxswains should keep clear of known sandbanks and shallow areas.
- If the gig does run aground, then the cox should attempt to free the boat by having the rower back water.
- If this doesn’t work, then do not waste further energy.
- If the tide is coming in then the most sensible thing to do is wait until there is enough water underneath the boat to re-float it.
- If the tide is going out, then consider allowing crew members to exit the boat to lighten the load and re-float the boat. This must be done in a controlled manner.
- Carefully plan who will exit the boat and how they will re-enter the boat after it becomes free.
- Be mindful of what you have gone aground on – estuary mud could present more of a hazard to an individual wading in it than having the entire crew wait for the tide to return.
APPENDIX 1 – NORMAL ROWING AREA
